(官方文档 ---- https://docs.open.alipay.com/203/105285/)
第一步:创建应用
要在您的应用中接入电脑网站支付能力,您需要登录支付宝开放平台(open.alipay.com),在开发者中心中创建您的应用,应用审核通过后会生成应用唯一标识(APPID),并且可以申请开通开放产品使用权限。通过 APPID 您的应用才能调用开放产品的接口能力。需要详细了解开放平台创建应用步骤请参考《开放平台应用创建指南》。

第二步:配置应用
添加功能并签约
应用创建完成后,系统会自动跳转到应用详情页面。开发者可以在 功能列表 中点击 添加功能 来添加电脑网站支付功能。待应用上线后,您可以给添加的功能进行签约。电脑网站支付功能支持两种签约方式:商家中心签约和应用详情的功能列表处签约(如下图所示)。
详细步骤步骤可以参考添加应用功能,第三方应用可以代替商户签约。
配置密钥

为了保证交易双方(商户和支付宝)的身份和数据安全,开发者在调用接口前,需要配置双方密钥,对交易数据进行双方校验。密钥包含应用私钥(APP_PRIVATE_KEY)和应用公钥(APP_PUBLIC_KEY)。生成密钥后,开发者需要在开放平台开发者中心进行密钥配置,配置完成后可以获取支付宝公钥(ALIPAY_PUBLIC_KEY),配置的详细步骤请参考《配置应用环境》。您还可以通过观看快速签名教程学习密钥的配置。
配置公钥--查看下面地址
--https://docs.open.alipay.com/291/105971

说明:
支付宝开放平台 SDK 封装了签名和验签过程,只需配置账号及密钥参数,建议开发者使用。开发者还可以通过自助排查流程和验签教程自助排查配置应用过程中遇到的问题。

第三步:集成并配置 SDK(我是github一个文件搞定支付)
转载---- https://github.com/dedemao/alipay/blob/master/wap.php
<?php
header('Content-type:text/html; Charset=utf-8');
/*** 请填写以下配置信息 ***/
$appid = 'xxxxx';  //https://open.alipay.com 账户中心->密钥管理->开放平台密钥,填写添加了电脑网站支付的应用的APPID
$returnUrl = 'http://www.xxx.com/alipay/return.php';     //付款成功后的同步回调地址
$notifyUrl = 'http://www.xxx.com/alipay/notify.php';     //付款成功后的异步回调地址
$outTradeNo = uniqid();     //你自己的商品订单号
$payAmount = 0.01;          //付款金额,单位:元
$orderName = '支付测试';    //订单标题
$signType = 'RSA2';			//签名算法类型,支持RSA2和RSA,推荐使用RSA2
$rsaPrivateKey='xxxxx';		//商户私钥,填写对应签名算法类型的私钥,如何生成密钥参考:https://docs.open.alipay.com/291/105971和https://docs.open.alipay.com/200/105310
/*** 配置结束 ***/
$aliPay = new AlipayService();
$aliPay->setAppid($appid);
$aliPay->setReturnUrl($returnUrl);
$aliPay->setNotifyUrl($notifyUrl);
$aliPay->setRsaPrivateKey($rsaPrivateKey);
$aliPay->setTotalFee($payAmount);
$aliPay->setOutTradeNo($outTradeNo);
$aliPay->setOrderName($orderName);
$sHtml = $aliPay->doPay();
echo $sHtml;
class AlipayService
{
    protected $appId;
    protected $charset;
    protected $returnUrl;
    protected $notifyUrl;
    //私钥值
    protected $rsaPrivateKey;
    protected $totalFee;
    protected $outTradeNo;
    protected $orderName;
    public function __construct()
    {
        $this->charset = 'utf-8';
    }
    public function setAppid($appid)
    {
        $this->appId = $appid;
    }
    public function setReturnUrl($returnUrl)
    {
        $this->returnUrl = $returnUrl;
    }
    public function setNotifyUrl($notifyUrl)
    {
        $this->notifyUrl = $notifyUrl;
    }
    public function setRsaPrivateKey($rsaPrivateKey)
    {
        $this->rsaPrivateKey = $rsaPrivateKey;
    }
    public function setTotalFee($payAmount)
    {
        $this->totalFee = $payAmount;
    }
    public function setOutTradeNo($outTradeNo)
    {
        $this->outTradeNo = $outTradeNo;
    }
    public function setOrderName($orderName)
    {
        $this->orderName = $orderName;
    }
    /**
     * 发起订单
     * @return array
     */
    public function doPay()
    {
        //请求参数
        $requestConfigs = array(
            'out_trade_no'=>$this->outTradeNo,
            'product_code'=>'QUICK_WAP_WAY',
            'total_amount'=>$this->totalFee, //单位 元
            'subject'=>$this->orderName,  //订单标题
        );
        $commonConfigs = array(
            //公共参数
            'app_id' => $this->appId,
            'method' => 'alipay.trade.wap.pay',             //接口名称
            'format' => 'JSON',
            'return_url' => $this->returnUrl,
            'charset'=>$this->charset,
            'sign_type'=>'RSA2',
            'timestamp'=>date('Y-m-d H:i:s'),
            'version'=>'1.0',
            'notify_url' => $this->notifyUrl,
            'biz_content'=>json_encode($requestConfigs),
        );
        $commonConfigs["sign"] = $this->generateSign($commonConfigs, $commonConfigs['sign_type']);
        return $this->buildRequestForm($commonConfigs);
    }
    /**
     * 建立请求,以表单HTML形式构造(默认)
     * @param $para_temp 请求参数数组
     * @return 提交表单HTML文本
     */
    protected function buildRequestForm($para_temp) {
        $sHtml = "<form id='alipaysubmit' name='alipaysubmit' action='https://openapi.alipay.com/gateway.do?charset=".$this->charset."' method='POST'>";
		foreach($para_temp as $key=>$val){
            if (false === $this->checkEmpty($val)) {
                $val = str_replace("'","'",$val);
                $sHtml.= "<input type='hidden' name='".$key."' value='".$val."'/>";
            }
		}
        //submit按钮控件请不要含有name属性
        $sHtml = $sHtml."<input type='submit' value='ok' style='display:none;''></form>";
        $sHtml = $sHtml."<script>document.forms['alipaysubmit'].submit();</script>";
        return $sHtml;
    }
    public function generateSign($params, $signType = "RSA") {
        return $this->sign($this->getSignContent($params), $signType);
    }
    protected function sign($data, $signType = "RSA") {
        $priKey=$this->rsaPrivateKey;
        $res = "-----BEGIN RSA PRIVATE KEY-----\n" .
            wordwrap($priKey, 64, "\n", true) .
            "\n-----END RSA PRIVATE KEY-----";
        ($res) or die('您使用的私钥格式错误,请检查RSA私钥配置');
        if ("RSA2" == $signType) {
            openssl_sign($data, $sign, $res, version_compare(PHP_VERSION,'5.4.0', '<') ? SHA256 : OPENSSL_ALGO_SHA256); //OPENSSL_ALGO_SHA256是php5.4.8以上版本才支持
        } else {
            openssl_sign($data, $sign, $res);
        }
        $sign = base64_encode($sign);
        return $sign;
    }
    /**
     * 校验$value是否非空
     *  if not set ,return true;
     *    if is null , return true;
     **/
    protected function checkEmpty($value) {
        if (!isset($value))
            return true;
        if ($value === null)
            return true;
        if (trim($value) === "")
            return true;
        return false;
    }
    public function getSignContent($params) {
        ksort($params);
        $stringToBeSigned = "";
        $i = 0;
        foreach ($params as $k => $v) {
            if (false === $this->checkEmpty($v) && "@" != substr($v, 0, 1)) {
                // 转换成目标字符集
                $v = $this->characet($v, $this->charset);
                if ($i == 0) {
                    $stringToBeSigned .= "$k" . "=" . "$v";
                } else {
                    $stringToBeSigned .= "&" . "$k" . "=" . "$v";
                }
                $i++;
            }
        }
        unset ($k, $v);
        return $stringToBeSigned;
    }
    /**
     * 转换字符集编码
     * @param $data
     * @param $targetCharset
     * @return string
     */
    function characet($data, $targetCharset) {
        if (!empty($data)) {
            $fileType = $this->charset;
            if (strcasecmp($fileType, $targetCharset) != 0) {
                $data = mb_convert_encoding($data, $targetCharset, $fileType);
                //$data = iconv($fileType, $targetCharset.'//IGNORE', $data);
            }
        }
        return $data;
    }
}月份:2020年11月
Vue的H5页面唤起支付宝支付功能
目前项目中比较常用的第三方支付无非就是支付宝支付和微信支付。下面介绍一下Vue中H5页面如何使用支付宝支付。这篇文章主要介绍了Vue的H5页面唤起支付宝支付,需要的朋友可以参考下
目前项目中比较常用的第三方支付无非就是支付宝支付和微信支付。下面介绍一下Vue中H5页面如何使用支付宝支付。其实很简单的,只不过是调自己后台的一个接口而已(后台根据支付宝文档,写好支付接口)。
触发支付宝支付调用后台接口,后台会返回支付宝提供的form表单,我们只要在vue里面创建新节点,将返回的form表单append进去,并提交就可以唤起支付宝支付。另在此说一下这个 returnUrl , 它是支付后支付宝回调的页面。具体可以根据自身业务,后台写死或者由前端控制。
methods () {/*** 支付宝支付*/goAlipay () {this.$loading.show()const data = {/* 自身接口所需的一些参数 */...amount: this.price,/* 支付后支付宝return的url */// returnUrl: 'www.baidu.com'returnUrl: window.location.origin + window.location.pathname + '?userParams=' + this.userParams}this.$http(this.$apiSetting.alipay,data).then(res => {this.$loading.hide()if (res.data.statusCode === '000000') {const div = document.createElement('div')/* 此处form就是后台返回接收到的数据 */div.innerHTML = res.data.data.alipayInfodocument.body.appendChild(div)document.forms[0].submit()}}, error => {this.$loading.hide()console.log(error)})}} |
总结
以上所述是小编给大家介绍的Vue的H5页面唤起支付宝支付功能,希望对大家有所帮助,如果大家有任何疑问请给我留言,小编会及时回复大家的。在此也非常感谢大家对脚本之家网站的支持!
如果你觉得本文对你有帮助,欢迎转载,烦请注明出处,谢谢!
Cocos Creator中AudioSource组件的使用
前言
在Cocos Creator游戏开发中, 为了改善用户体验,通常会使用声音特效。
一、cc.AudioSource组件简介和基础使用
1:AudioSource组件是音频源组件, 发出声音的源头;
2: AudioSource组件面板:
clip: 声源的播放的音频对象: AudioClip, mp3, wav, ogg,
volume: 音量大小, [0, 1]百分比
mute: 是否静音;
Loop: 是否循环播放;
Play on Load: 是否在组件加载的时候播放;
Preload: 是否预先加载;
二、cc.AudioClip对象
1: 音频剪辑对象,支持的格式有mp3, wav, ogg
2: 可以在编辑器上手动关联,生成AudioCip对象;
3: 可以通过代码加载AudioCip; (后续资源加载模块详细讲解);
三、AudioSource代码使用
1: 代码中获得cc.AudioSource组件:
编辑器关联;
代码获取组件;
2: AudioSource 主要的方法:
play(); 播放音频;
stop(); 停止声音播放;
pause(); 暂停声音播放;
resume(); 恢复声音播放;
rewind(); 重头开始播放;
其它接口见文档;
3: AudioSource代码主要属性:
loop: 是否循环播放
isPlaying: 是否正在播放;
mute: 是否静音;
如果要在开始的时候设置某些属性,可以放到start函数里面;
start () {
      let audioSource : cc.AudioSource = this.node.getChildByName("AudioNode").getComponent(cc.AudioSource);
      audioSource.volume = 0.5;

      this.scheduleOnce(function(){
          console.log(audioSource.isPlaying);
          audioSource.pause();     // 暂停播放
      }, 1);

      this.scheduleOnce(function(){
          console.log("2",audioSource.isPlaying);
          audioSource.resume();   // 恢复播放
      }, 2);

      this.scheduleOnce(function(){
          console.log("3",audioSource.isPlaying);
          audioSource.rewind();   // 从头开始播放
      }, 3);

      this.scheduleOnce(function(){
          console.log("4",audioSource.isPlaying);
          audioSource.stop();   // 停止播放
      }, 4);

}cocos creator基础-(九)cc.AudioSource使用
1: 掌握cc.AudioSource组件的使用;
cc.AudioSource
1:AudioSource组件是音频源组件, 发出声音的源头;
2: AudioSource组件面板:
clip: 声源的播放的音频对象: AudioClip, mp3, wav, ogg,
volume: 音量大小, [0, 1]百分比
mute: 是否静音;
Loop: 是否循环播放;
Play on Load: 是否在组件加载的时候播放;
Preload: 是否预先加载;
cc.AudioClip对象
1: 音频剪辑对象,支持的格式有mp3, wav, ogg
2: 可以在编辑器上手动关联,生成AudioCip对象;
3: 可以通过代码加载AudioCip; (资源加载详细讲解);
AudioSource代码使用
1: 代码中获得cc.AudioSource组件:
编辑器关联;
代码获取组件;
2: AudioSource 主要的方法:
play(); 播放音频;
stop(); 停止声音播放;
pause(); 暂停声音播放;
resume(); 恢复声音播放;
rewind(); 重头开始播放;
其它接口见文档;
3: AudioSource代码主要属性:
loop: 是否循环播放
isPlaying: 是否正在播放;
mute: 是否静音;
如果要在开始的时候设置某些属性,可以放到start函数里面;

cc.Class({
    extends: cc.Component,

    properties: {
        // foo: {
        //    default: null,      // The default value will be used only when the component attaching
        //                           to a node for the first time
        //    url: cc.Texture2D,  // optional, default is typeof default
        //    serializable: true, // optional, default is true
        //    visible: true,      // optional, default is true
        //    displayName: 'Foo', // optional
        //    readonly: false,    // optional, default is false
        // },
        // ...
        // 编辑器来指定
        audio: {
            type: cc.AudioSource,
            default: null,
        },
    },

    // use this for initialization
    onLoad: function () {
        // 获得节点, 获得节点上的组件
        this.audio2 = this.node.getChildByName("audio").getComponent(cc.AudioSource);
    },

    start: function() {
        this.audio2.loop = true; // 循环播放, 注意一下位置
        this.audio2.mute = false; // 设置静音
        console.log(this.audio2.isPlaying); // 是否正在播放
        // this.audio.play();
        this.audio2.play();

        /*this.scheduleOnce(function() {
            this.audio.stop();
        }.bind(this), 3);*/

        /*this.scheduleOnce(function() {
            this.audio.pause(); // 暂停
        }.bind(this), 3);

        this.scheduleOnce(function() {
            this.audio.resume(); // 恢复
        }.bind(this), 6);*/
    },
    // called every frame, uncomment this function to activate update callback
    // update: function (dt) {

    // },
});
使用 AudioSource 组件播放
- 层级管理器 上创建一个空节点
- 选中空节点,在 属性检查器 最下方点击 添加组件 -> 其他组件 -> AudioSource 来添加 AudioSource 组件
- 将 资源管理器 中所需的音频资源拖拽到 AudioSource 组件的 Clip 中,如下所示:
然后根据需要对 AudioSource 组件的其他参数项进行设置即可,参数详情可参考 AudioSource 组件参考。
- 通过脚本控制 AudioSource 组件如果只需要在游戏加载完成后自动播放音频,那么勾选 AudioSource 组件的 Play On Load 即可。如果要更灵活的控制 AudioSource 的播放,可以在自定义脚本中获取 AudioSource 组件,然后调用相应的 API,如下所示:
  // AudioSourceControl.js
  cc.Class({
      extends: cc.Component,

      properties: {
          audioSource: {
              type: cc.AudioSource,
              default: null
          },
      },

      play: function () {
          this.audioSource.play();
      },

      pause: function () {
          this.audioSource.pause();
      },
  });
然后在编辑器的 属性检查器 中添加对应的用户脚本组件。选择相对应的节点,在 属性检查器 最下方点击 添加组件 -> 用户脚本组件 -> 用户脚本,即可添加脚本组件。然后将带有 AudioSource 组件的节点拖拽到脚本组件中的 Audio Source 上,如下所示:
使用 AudioEngine 播放
AudioEngine 与 AudioSource 都能播放音频,它们的区别在于 AudioSource 是组件,可以添加到场景中,由编辑器设置。而 AudioEngine 是引擎提供的纯 API,只能在脚本中进行调用。如下所示:
- 在脚本的 properties 中定义一个 AudioClip 资源对象
- 直接使用
cc.audioEngine.play(audio, loop, volume);播放,如下所示:// AudioEngine.js cc.Class({ extends: cc.Component, properties: { audio: { default: null, type: cc.AudioClip } }, onLoad: function () { this.current = cc.audioEngine.play(this.audio, false, 1); }, onDestroy: function () { cc.audioEngine.stop(this.current); } });
目前建议使用 audioEngine.play 接口来统一播放音频。或者也可以使用 audioEngine.playEffect 和 audioEngine.playMusic 这两个接口,前者主要是用于播放音效,后者主要是用于播放背景音乐。具体可查看 API 文档。
AudioEngine 播放的时候,需要注意这里传入的是一个完整的 AudioClip 对象(而不是 url)。所以不建议在 play 接口内直接填写音频的 url 地址,而是希望用户在脚本的 properties 中先定义一个 AudioClip,然后在编辑器的 属性检查器 中添加对应的用户脚本组件,将音频资源拖拽到脚本组件的 audio-clip 上。如下所示:

注意:如果音频播放相关的设置都完成后,在部分浏览器上预览或者运行时仍听不到声音,那可能是由于浏览器兼容性导致的问题。例如: Chrome 禁用了 WebAudio 的自动播放,而音频默认是使用 Web Audio 的方式加载并播放的,此时用户就需要在 资源管理器 中选中音频资源,然后在 属性检查器 中将音频的加载模式修改为 DOM Audio 才能在浏览器上正常播放。详情可参考 声音资源 和 兼容性说明。

Cocos Creator 动态加载音效资源
cc.loadRes(“Sound/game_turntable.mp3”, cc.AudioClip, (err, audioClip)=> {
console.log( “==>”+ typeof audioClip);
});
});
Cocos Creator 音频API控制调频
2017-11-23 01:20 罗任德 阅读(1802) 评论(0) 编辑收藏*****音频的一些控制*****cc.audioEngine.playMusic(this.BGAudio,true);//播放音乐(true代表循环)cc.audioEngine.stopMusic()//停止播放背景音乐cc.audioEngine.playEffect(this.ClickAudio,false);//播放音效(false代表只播放一次)cc.audioEngine.stopEffect(音效变量名);//停止指定音效(需要先把音效赋值给变量)cc.audioEngine.AllEffects();//停止所有音效cc.audioEngine.setMusicVolume(参数); //设置背景音乐的音量(该参数范围是0到1)cc.audioEngine.setEffectsVolume(参数); //设置音效的音量(该参数范围是0到1)
3ds Max人头建模制作实例教程
本教程是了一个关于用3ds max制作人头建模的另类教程,讲解详细。

工具/原料
- 下载:xy3dsmax.com
- 电脑
方法/步骤
- 1首先我从曲线工具开始(曲线的创造不是光滑的),把嘴巴的外轮廓和内轮廓先画出来,然后把这两个线条连接起来,并把他转为polygon。
- 2然后象图中一样显示或者增加隐藏的线,因此图形是由poly组成的。你可以通过用connect工具把相关的点连接起来。最简单的方法就是用一个mesh tools的插件来把这些点连接,成为poly。
- 3选择外圈的边,然后用chamfer工具,形成更多的可以利用的点。
- 4增加了更多的点以后,然后来确定嘴巴的形状。嘴巴后面的点往后拉,嘴唇的点向前拉。此时需要注意的是在嘴巴每个拐角的地方有两个相邻的点来帮助确定形状。
- 5继续调整点,我在下嘴唇部分增加了许多的点,还有拐角处。
- 6希望你所做的形状目前为止是这样的。在上嘴唇的部分我增加了一排的点,并且把内嘴唇的边线进行了倒边,并且把这些点更加往里移动了,目的是为了增加嘴唇的圆滑。现在开始做眼睛。
- 7眼睛部分的创建跟嘴巴部分是基本一样的。你也可以先创建眼睛的外部轮廓,然后往里进行倒边,删除里面的poly,得到眼窝部分。再把内部的线继续数次倒边来创建眼皮。
- 8经过一系列调整以后,得到这样的形状。我又增加了许多的点来创建鼻梁部分。记得要把眼睛部分弯曲,上眼皮要比下眼皮靠前一些。
- 9鼻子部分可以在开始创建的时候创建一个4*6的平面,然后把他拉动,调整到如图的形状。然后沿着鼻子底端增加一排点到拐角处。要知道的是我只是创建了鼻子的一半,你可以用mirror或者别的工具复制另外的一部分,所以我们只需要制作鼻子的一半。
- 10给鼻孔创建多的poly,然后选择poly往里面拉。继续调整并增加面,这样你就可以结束一个阶段了。
- 11在完成了以上的3个重要的部分以后,再把他们放到一起,并且确定正确的比例把他们结合。同时也增加眼球,然后再对眼睛的形状进行调整。
- 12接下来的部分就是增加头部的其他部分,我用一个球型开始的,然后用ffd工具将他变形。很重要的一点就是我确定了球型最后的在嘴部的终止的位置,因此曲线是按照脸部的走向来的。
- 13返回面部,把他们三部分连接,在需要的地方增加或者删除点。
- 14此时增加细分工具,看有没有出问题,帮助我们重新调整鼻子,眼睛嘴巴部分的细节。
- 15返回头部的形状,我拉伸了球的底端几次,来创建脖子部分,继续调整点让他能够与剩下的脸部分能够结合。
- 16如果需要的话对头部的面进行细分,目的是让他能够与面部更能够好的焊接融合。这可能需要额外的面来增加。
- 17缝合好了以后,我们增加meshsmooth来发现问题,然后继续调整脸部和头部的形状。
- 18耳朵部分,这个部分是有很多的技巧。我以一个6*10的平面开始,然后把他调整成耳朵的形状,再拉伸激磁,在需要调整成如图样子的地方焊接点。一个耳朵的参考图片是很重要的。
- 19接下来就是把耳朵连接到头上,由于耳朵有许多的细节,你需要的是把头部给切分几次,你才能把耳朵进行很好的焊接。
- 20嘴巴内部的制作,创建时需要将头部的一半隐藏,在与头部相连之前它需要单独的创建,这部分可以弄得简单一些,这样给嘴巴做动画的时候比较容易一些。
- 21最后我要检查整个的模型,并且增加一些东西使头部不至于看起来太对称了,比如把鼻子向左边弯曲一些,向下移动眼球,移动嘴巴等。这些都是为了是模型的理想,给你的模型赋予角色。
- 22在增加材质和眼睛以前对模型的渲染测试。然后我再复制一个对它变形得到满意的样式,这样可以更简单的赋予它材质。END
注意事项
- 以上就是使用3ds Max制作一个另类头像的全过程了,请继续关注3ds Max中文官网。
- 如果您觉得本经验有帮助,请点击正下方的或右上角的“大拇指”或“分享”或“关注TA”给我支持和鼓励。为了方便下次寻找,您可以点击“收藏”收藏本经验。
- https://jingyan.baidu.com/article/39810a234f4629b636fda6f4.html
Cocos Creator 3D 入门教程:快速上手,制作第一款游戏!

跟随教程制作一款名叫《一步两步》的魔性小游戏,从新建项目到完整工程代码都有,帮助新手开发者了解 Cocos Creator 3D 游戏开发流程中的基本概念和工作流程。
快速上手制作你的第一个游戏
Cocos Creator 3D编辑器的强大之处就是可以让开发者快速地制作游戏原型,下面我们将跟随教程制作一款名叫 《一步两步》 的魔性小游戏。这款游戏非常考验玩家的反应能力,玩家根据路况选择是要跳一步还是跳两步,“一步两步,一步两步,一步一步似爪牙似魔鬼的步伐”。
体验游戏(仅支持桌面鼠标操作):
Cocos Creator 3D 下载地址:
一、新建项目
如果您还不了解如何获取和启动 Cocos Creator 3D,请阅读 [安装和启动]一节。
1. 首先启动 Cocos Creator 3D,然后新建一个名为 MindYourStep 的项目,如果不知道如果创建项目,请阅读 [Hello World!]
2. 新建项目后会看到如下的编辑器界面:
二、创建游戏场景
在 Cocos Creator 3D 中,游戏场景(Scene)是开发时组织游戏内容的中心,也是呈现给玩家所有游戏内容的载体,游戏场景中一般会包括以下内容:
- 场景物体
- 角色
- UI
- 以组件形式附加在场景节点上的游戏逻辑脚本
当玩家运行游戏时,就会载入游戏场景,游戏场景加载后就会自动运行所包含组件的游戏脚本,实现各种各样开发者设置的逻辑功能。所以除了资源以外,游戏场景是一切内容创作的基础。
现在,让我们来新建一个场景。
1. 在 资源管理器 中点击选中 asset 目录,点击 资源管理器 左上角的 加号 按钮,选择文件夹,命名为 Scenes。
2.点击先中 Scenes 目录(下图把一些常用的文件夹都提前创建好了),点击鼠标右键,在弹出的菜单中选择 场景文件。
3. 我们创建了一个名叫 New Scene 的场景文件,创建完成后场景文件 New Scene 的名称会处于编辑状态,将它重命名为 Main。
4. 双击 Main,就会在场景编辑器和层级管理器中打开这个场景。
三、添加跑道
我们的主角需要在一个由方块(Block)组成的跑道上从屏幕左边向右边移动。我们使用编辑器自带的立方体(Cube)来组成道路。
1. 在 层级管理器 中创建一个立方体(Cube),并命名为 Cube。

2. 选中 Cube,按 Ctrl+D 来复制出 3 个 Cube。
3. 将 3 个 Cube 按以下坐标排列:第一个节点位置(0,-1.5,0),第二个节点位置(1,-1.5,0),第三个节点位置(2,-1.5,0)。
效果如下:
四、添加主角
1、创建主角节点
首先创建一个名字为Player的空节点,然后在这个空节点下创建名为Body的主角模型节点,为了方便,我们采用编辑器自带的胶囊体模型做为主角模型。

分为两个节点的好处是,我们可以使用脚本控制 Player 节点来使主角进行水平方向移动,而在 Body 节点上做一些垂直方向上的动画(比如原地跳起后下落),两者叠加形成一个跳越动画。
将 Player 节点设置在(0,0,0)位置,使得它能站在第一个方块上。效果如下:
2、编写主角脚本
想要主角影响鼠标事件来进行移动,我们就需要编写自定义的脚本。如果您从没写过程序也不用担心,我们会在教程中提供所有需要的代码,只要复制粘贴到正确的位置就可以了,之后这部分工作可以找您的程序员小伙伴来解决。下面让我们开始创建驱动主角行动的脚本吧。
(1)创建脚本
1. 如果还没有创建 Scripts 文件夹,首先在 资源管理器 中右键点击 assets 文件夹,选择 新建 -> 文件夹,重命名为 Scripts。
2. 右键点击 Scripts 文件夹,选择 新建 -> TypeScript ,创建一个 TypeScript 脚本,有关 TypeScript 资料可以查看 [TypeScript 官方网站]
3. 将新建脚本的名字改为 PlayerController,双击这个脚本,打开代码编辑器,例如VSCode。

注意:Cocos Creator 3D 中脚本名称就是组件的名称,这个命名是大小写敏感的!如果组件名称的大小写不正确,将无法正确通过名称使用组件!
(2)编写脚本代码
在打开的 PlayerController 脚本里已经有了预先设置好的一些代码块,如下所示:
import { _decorator, Component } from “cc”;
const { ccclass, property } = _decorator;
@ccclass(“PlayerController”)
export class PlayerController extends Component {
/* class member could be defined like this */
// dummy = ”;
/* use `property` decorator if your want the member to be serializable */
// @property
// serializableDummy = 0;
start () {
// Your initialization goes here.
}
// update (deltaTime: number) {
// // Your update function goes here.
// }
}
这些代码就是编写一个组件(脚本)所需的结构,具有这样结构的脚本就是 Cocos Creator 3D 中的组件(Component),他们能够挂载到场景中的节点上,提供控制节点的各种功能,更详细的脚本信息可以查看 [脚本]。
我们在脚本中添加对鼠标事件的监听,然后让 Player 动起来,将 PlayerController 中代码做如下修改:
import { _decorator, Component, Vec3, systemEvent, SystemEvent, EventMouse, AnimationComponent } from “cc”;
const { ccclass, property } = _decorator;
@ccclass(“PlayerController”)
export class PlayerController extends Component {
/* class member could be defined like this */
// dummy = ”;
/* use `property` decorator if your want the member to be serializable */
// @property
// serializableDummy = 0;
// for fake tween
private _startJump: boolean = false;
private _jumpStep: number = 0;
private _curJumpTime: number = 0;
private _jumpTime: number = 0.1;
private _curJumpSpeed: number = 0;
private _curPos: Vec3 = cc.v3();
private _deltaPos: Vec3 = cc.v3(0, 0, 0);
private _targetPos: Vec3 = cc.v3();
private _isMoving = false;
start () {
// Your initialization goes here.
systemEvent.on(SystemEvent.EventType.MOUSE_UP, this.onMouseUp, this);
}
onMouseUp(event: EventMouse) {
if (event.getButton() === 0) {
this.jumpByStep(1);
} else if (event.getButton() === 2) {
this.jumpByStep(2);
}
}
jumpByStep(step: number) {
if (this._isMoving) {
return;
}
this._startJump = true;
this._jumpStep = step;
this._curJumpTime = 0;
this._curJumpSpeed = this._jumpStep / this._jumpTime;
this.node.getPosition(this._curPos);
Vec3.add(this._targetPos, this._curPos, cc.v3(this._jumpStep, 0, 0));
this._isMoving = true;
}
onOnceJumpEnd() {
this._isMoving = false;
}
update (deltaTime: number) {
if (this._startJump) {
this._curJumpTime += deltaTime;
if (this._curJumpTime > this._jumpTime) {
// end
this.node.setPosition(this._targetPos);
this._startJump = false;
this.onOnceJumpEnd();
} else {
// tween
this.node.getPosition(this._curPos);
this._deltaPos.x = this._curJumpSpeed * deltaTime;
Vec3.add(this._curPos, this._curPos, this._deltaPos);
this.node.setPosition(this._curPos);
}
}
}
}
现在我们可以把 PlayerController 组件添加到主角节点上。在 层级管理器 中选中 Player 节点,然后在 属性检查器 中点击 添加组件 按钮,选择 添加用户脚本组件 -> PlayerController ,为主角节点添加 PlayerController 组件。
为了能在运行时看到物体,我们需要将场景中的 Camera 进行一些参数调整,将位置放到(0,0,13),Color设置为(50,90,255,255):
现在点击工具栏中心位置的 Play 按钮:在打开的网页中点击鼠标左键和右键,可以看到如下画面:

更多的预览功能,可以参考 [项目预览调试]。
3、添加角色动画
从上面运行的结果可以看到单纯对 Player 进行水平方向的移动是十分呆板的,我们要让 Player 跳跃起来才比较有感觉,我们可以通过为角色添加垂直方向的动画来达到这个效果。有关 动画编辑器 的更多信息,请阅读 [动画编辑器]
(1)选中场景中的 Body 节点,编辑器下方 控制台 边上的 动画编辑器,添加 Animation 组件并创建 Clip,命名为 oneStep。

(2)进入动画编辑模式,添加 position 属性轨道,并添加三个关键帧,position 值分别为(0,0,0)、(0,0.5,0)、(0,0,0)。

退出动画编辑模式前前记得要保存动画,否则做的动画就白费了。
(3)我们还可以通过 资源管理器 来创建 Clip,下面我们创建一个名为 twoStep 的 Clip 并将它添加到 Body 身上的 AnimationComponent 上,这里为了录制方便调整了一下面板布局。

(4)进入动画编辑模式,选择并编辑 twoStep 的 clip,类似第 2 步,添加三个 position 的关键帧,分别为(0,0,0)、(0,1,0)、(0,0,0)。
(5) 在 PlayerController 组件中引用动画组件,我们需要在代码中根据跳的步数不同来播放不同的动画。
首先需要在 PlayerController 组件中引用 Body 身上的 AnimationComponent。
@property({type: AnimationComponent})
public BodyAnim: AnimationComponent = null;
然后在属性检查器中将 Body 身上的 AnimationComponent 拖到这个变量上。

在跳跃的函数 jumpByStep 中加入动画播放的代码:
if (step === 1) {
this.BodyAnim.play(‘oneStep’);
} else if (step === 2) {
this.BodyAnim.play(‘twoStep’);
}
点击 Play 按钮,点击鼠标左键、右键,可以看到新的跳跃效果:

五、跑道升级
为了让游戏有更久的生命力,我们需要一个很长的跑道来让 Player 在上面一直往右边跑,在场景中复制一堆 Cube 并编辑位置来组成跑道显然不是一个明智的做法,我们通过脚本完成跑道的自动创建。
1、游戏管理器(GameManager)
一般游戏都会有一个管理器,主要负责整个游戏生命周期的管理,可以将跑道的动态创建代码放到这里。在场景中创建一个名为 GameManager 的节点,然后在 assets/Scripts 中创建一个名为 GameManager 的 ts 脚本文件,并将它添加到 GameManager 节点上。
2、制作 Prefab
对于需要重复生成的节点,我们可以将他保存成 Prefab(预制)资源,作为我们动态生成节点时使用的模板。关于 Prefab 的更多信息,请阅读 [预制资源(Prefab)]
我们将生成跑道的基本元素 正方体(Cube)制作成 Prefab,之后可以把场景中的三个 Cube 都删除了。

3、添加自动创建跑道代码
我们需要一个很长的跑道,理想的方法是能动态增加跑道的长度,这样可以永无止境的跑下去,这里为了方便我们先生成一个固定长度的跑道,跑道长度可以自己定义。跑道上会生成一些坑,跳到坑上就 GameOver了。
将 GameManager 脚本中代码替换成以下代码:
import { _decorator, Component, Prefab, instantiate, Node, CCInteger} from “cc”;
const { ccclass, property } = _decorator;
enum BlockType{
BT_NONE,
BT_STONE,
};
@ccclass(“GameManager”)
export class GameManager extends Component {
@property({type: Prefab})
public cubePrfb: Prefab = null;
@property({type: CCInteger})
public roadLength: Number = 50;
private _road: number[] = [];
start () {
this.generateRoad();
}
generateRoad() {
this.node.removeAllChildren(true);
this._road = [];
// startPos
this._road.push(BlockType.BT_STONE);
for (let i = 1; i < this.roadLength; i++) {
if (this._road[i-1] === BlockType.BT_NONE) {
this._road.push(BlockType.BT_STONE);
} else {
this._road.push(Math.floor(Math.random() * 2));
}
}
for (let j = 0; j < this._road.length; j++) {
let block: Node = this.spawnBlockByType(this._road[j]);
if (block) {
this.node.addChild(block);
block.setPosition(j, -1.5, 0);
}
}
}
spawnBlockByType(type: BlockType) {
let block = null;
switch(type) {
case BlockType.BT_STONE:
block = instantiate(this.cubePrfb);
break;
}
return block;
}
// update (deltaTime: number) {
// // Your update function goes here.
// }
}
在 GameManager 的 inspector 面板中可以通过修改 roadLength 的值来改变跑道的长度。预览可以看到现在自动生成了跑道,不过因为 Camera 没有跟随 Player 移动,所以看不到后面的跑道,我们可以将场景中的 Camera 设置为 Player 的子节点。

这样 Camera 就会跟随 Player 的移动而移动,现在预览可以从头跑到尾的观察生成的跑道了。
五、增加开始菜单
开始菜单是游戏不可或缺的一部分,我们可以在这里加入游戏名称、游戏简介、制作人员等信息。
1、添加一个名为 Play 的按钮

这个操作生成了一个 Canvas 节点,一个 PlayButton 节点和一个 Label 节点。因为 UI 组件需要在带有 CanvasComponent 的父节点下才能显示,所以编辑器在发现目前场景中没有带这个组件的节点时会自动添加一个。
创建按钮后,将 Label 节点上的 cc.LabelComponent 的 String 属性从 Button 改为 Play。
2、在 Canvas 底下创建一个名字为 StartMenu 的空节点,将 PlayButton 拖到它底下。我们可以通过点击工具栏上的 2D/3D 按钮来切换到 2D 编辑视图下进行 UI 编辑操作,详细的描述请查阅 [场景编辑]
3、增加一个背景框,在 StartMenu 下新建一个名字为 BG 的 Sprite 节点,调节它的位置到 PlayButton 的上方,设置它的宽高为(200,200),并将它的 SpriteFrame 设置为 internal/default_ui/default_sprite_splash 。
4、添加一个名为 Title 的 Label 用于开始菜单的标题。

5、修改 Title 的文字,并调整 Title 的位置、文字大小、颜色。
6、增加操作的 Tips,然后调整 PlayButton 的位置,一个简单的开始菜单就完成了。
7、增加游戏状态逻辑,一般我们可以将游戏分为三个状态:
- 初始化(Init):显示游戏菜单,初始化一些资源。
- 游戏进行中(Playing):隐藏游戏菜单,玩家可以操作角度进行游戏。
- 结束(End):游戏结束,显示结束菜单。
使用一个枚举(enum)类型来表示这几个状态。
enum BlockType{
BT_NONE,
BT_STONE,
};
enum GameState{
GS_INIT,
GS_PLAYING,
GS_END,
};
GameManager 脚本中加入表示当前状态的私有变量
private _curState: GameState = GameState.GS_INIT;
为了在开始时不让用户操作角色,而在游戏进行时让用户操作角色,我们需要动态的开启和关闭角色对鼠标消息的监听。所以对 PlayerController 做如下的修改:
start () {
// Your initialization goes here.
//systemEvent.on(SystemEvent.EventType.MOUSE_UP, this.onMouseUp, this);
}
setInputActive(active: boolean) {
if (active) {
systemEvent.on(SystemEvent.EventType.MOUSE_UP, this.onMouseUp, this);
} else {
systemEvent.off(SystemEvent.EventType.MOUSE_UP, this.onMouseUp, this);
}
}
然后需要在 GameManager 脚本中引用 PlayerController,需要在 Inspector 中将场景的 Player 拖入到这个变量中。
@property({type: PlayerController})
public playerCtrl: PlayerController = null;
为了动态的开启\关闭开启菜单,我们需要在 GameManager 中引用 StartMenu 节点,需要在 Inspector 中将场景的 StartMenu 拖入到这个变量中。
@property({type: Node})
public startMenu: Node = null;
增加状态切换代码,并修改 GameManger 的初始化方法:
start () {
this.curState = GameState.GS_INIT;
}
init() {
this.startMenu.active = true;
this.generateRoad();
this.playerCtrl.setInputActive(false);
this.playerCtrl.node.setPosition(cc.v3());
}
set curState (value: GameState) {
switch(value) {
case GameState.GS_INIT:
this.init();
break;
case GameState.GS_PLAYING:
this.startMenu.active = false;
setTimeout(() => { //直接设置active会直接开始监听鼠标事件,做了一下延迟处理
this.playerCtrl.setInputActive(true);
}, 0.1);
break;
case GameState.GS_END:
break;
}
this._curState = value;
}
8、添加对 Play 按钮的事件监听。
为了能在点击 Play 按钮后开始游戏,我们需要对按钮的点击事件做出响应。在 GameManager 脚本中加入响应按钮点击的代码,在点击后进入游戏的 Playing 状态:
onStartButtonClicked() {
this.curState = GameState.GS_PLAYING;
}
然后在 Play 按钮的 Inspector 上添加 ClickEvents 的响应函数。
现在预览场景就可以点击 Play 按钮开始游戏了。
七、添加游戏结束逻辑
目前游戏角色只是呆呆的往前跑,我们需要添加游戏规则,来让他跑的更有挑战性。
1、角色每一次跳跃结束需要发出消息,并将自己当前所在位置做为参数发出消息。在 PlayerController 中记录自己跳了多少步:
private _curMoveIndex = 0;
// …
jumpByStep(step: number) {
// …
this._curMoveIndex += step;
}
在每次跳跃结束发出消息:
onOnceJumpEnd() {
this._isMoving = false;
this.node.emit(‘JumpEnd’, this._curMoveIndex);
}
2. 在 GameManager 中监听角色跳跃结束事件,并根据规则判断输赢,增加失败和结束判断,如果跳到空方块或是超过了最大长度值都结束:
checkResult(moveIndex: number) {
if (moveIndex <= this.roadLength) {
if (this._road[moveIndex] == BlockType.BT_NONE) { //跳到了空方块上
this.curState = GameState.GS_INIT;
}
} else { // 跳过了最大长度
this.curState = GameState.GS_INIT;
}
}
监听角色跳跃消息,并调用判断函数:
start () {
this.curState = GameState.GS_INIT;
this.playerCtrl.node.on(‘JumpEnd’, this.onPlayerJumpEnd, this);
}
// …
onPlayerJumpEnd(moveIndex: number) {
this.checkResult(moveIndex);
}
此时预览,会发现重新开始游戏时会有判断出错,是因为我们重新开始时没有重置 PlayerController 中的 _curMoveIndex 属性值。所以我们在 PlayerController 中增加一个 reset 函数:
reset() {
this._curMoveIndex = 0;
}
在GameManager的init函数调用reset来重置PlayerController的属性。
init() {
\\ …
this.playerCtrl.reset();
}
八、步数显示
我们可以将当前跳的步数显示到界面上,这样在跳跃过程中看着步数的不断增长会十分有成就感。
1、在 Canvas 下新建一个名为 Steps 的 Label,调整位置、字体大小等属性。
2、在 GameManager 中引用这个 Label:
@property({type: LabelComponent})
public stepsLabel: LabelComponent = null;
3、将当前步数数据更新到这个 Label 中,因为我们现在没有结束界面,游戏结束就跳回开始界面,所以在开始界面要看到上一次跳的步数,因此我们在进入 Playing 状态时,将步数重置为 0。
set curState (value: GameState) {
switch(value) {
case GameState.GS_INIT:
this.init();
break;
case GameState.GS_PLAYING:
this.startMenu.active = false;
this.stepsLabel.string = ‘0’; // 将步数重置为0
setTimeout(() => { //直接设置active会直接开始监听鼠标事件,做了一下延迟处理
this.playerCtrl.setInputActive(true);
}, 0.1);
break;
case GameState.GS_END:
break;
}
this._curState = value;
}
在响应角色跳跃的函数中,将步数更新到 Label 控件上
onPlayerJumpEnd(moveIndex: number) {
this.stepsLabel.string = ” + moveIndex;
this.checkResult(moveIndex);
}
九、光照和阴影
有光的地方就会有影子,光和影构成明暗交错的 3D 世界。接下来我们为角色加上简单的影子。
1、开启阴影
(2) 在 层级管理器 中点击最顶部的 Scene 节点,将 planarShadows 选项中的 Enabled 打钩,并修改 Distance 和 Normal 参数。
(2)点击 Player 节点下的 Body 节点,将 cc.ModelComponent 下的 ShadowCastingMode 设置为 ON。
此时在场景编辑器中会看到一个阴影面片,预览会发现看不到这个阴影,因为它在模型的正后方,被胶囊体盖住了。
2、调整光照
新建场景时默认会添加一个 DirctionalLight,由这个平行光计算阴影,所以为了让阴影换个位置显示,我们可以调整这个平行光的方向。
在 层级管理器 中点击选中 Main Light 节点,调整 Rotation 参数为(-10,17,0)。
预览可以看到影子效果:
十、添加主角模型
用胶囊体当主角显的有点寒碜,所以我们花(低)重(预)金(算)制作了一个 Cocos 主角。
1、导入模型资源
从原始资源导入模型、材质、动画等资源不是本篇基础教程的重点,所以这边直接使用已经导入工程的资源。
将[项目工程]中 assets 目录下的 Cocos 文件夹拷贝到你自己工程的 assets目录下。
2、添加到场景中
在 Cocos 文件中已经包含了一个名为 Cocos 的 Prefab,将它拖到场景中 Player 下的 Body 节点中。
此时会发现模型有些暗,可以加个聚光灯,以突出它锃光瓦亮的脑门。
3、添加跳跃动画
现在预览可以看到主角初始会有一个待机动画,但是跳跃时还是用这个待机动画会显得很不协调,所以我们在跳跃过程中换成跳跃的动画。在 PlayerController 类中添加一个引用模型动画的变量:
@property({type: SkeletalAnimationComponent})
public CocosAnim: SkeletalAnimationComponent = null;
然后在 Inspector 中要将 Cocos 节点拖入这个变量里。在 jumpByStep 函数中播放跳跃动画
jumpByStep(step: number) {
if (this._isMoving) {
return;
}
this._startJump = true;
this._jumpStep = step;
this._curJumpTime = 0;
this._curJumpSpeed = this._jumpStep / this._jumpTime;
this.node.getPosition(this._curPos);
Vec3.add(this._targetPos, this._curPos, cc.v3(this._jumpStep, 0, 0));
this._isMoving = true;
this.CocosAnim.getState(‘cocos_anim_jump’).speed = 3.5; //跳跃动画时间比较长,这里加速播放
this.CocosAnim.play(‘cocos_anim_jump’); //播放跳跃动画
if (step === 1) {
//this.BodyAnim.play(‘oneStep’);
} else if (step === 2) {
this.BodyAnim.play(‘twoStep’);
}
this._curMoveIndex += step;
}
在 onOnceJumpEnd 函数中让主角变为待机状态,播放待机动画。
onOnceJumpEnd() {
this._isMoving = false;
this.CocosAnim.play(‘cocos_anim_idle’);
this.node.emit(‘JumpEnd’, this._curMoveIndex);
}
预览效果:

十一、最终代码
PlayerController.ts
import { _decorator, Component, Vec3, systemEvent, SystemEvent, EventMouse, AnimationComponent, SkeletalAnimationComponent } from “cc”;
const { ccclass, property } = _decorator;
@ccclass(“PlayerController”)
export class PlayerController extends Component {
@property({type: AnimationComponent})
public BodyAnim: AnimationComponent = null;
@property({type: SkeletalAnimationComponent})
public CocosAnim: SkeletalAnimationComponent = null;
// for fake tween
private _startJump: boolean = false;
private _jumpStep: number = 0;
private _curJumpTime: number = 0;
private _jumpTime: number = 0.3;
private _curJumpSpeed: number = 0;
private _curPos: Vec3 = cc.v3();
private _deltaPos: Vec3 = cc.v3(0, 0, 0);
private _targetPos: Vec3 = cc.v3();
private _isMoving = false;
private _curMoveIndex = 0;
start () {
}
reset() {
this._curMoveIndex = 0;
}
setInputActive(active: boolean) {
if (active) {
systemEvent.on(SystemEvent.EventType.MOUSE_UP, this.onMouseUp, this);
} else {
systemEvent.off(SystemEvent.EventType.MOUSE_UP, this.onMouseUp, this);
}
}
onMouseUp(event: EventMouse) {
if (event.getButton() === 0) {
this.jumpByStep(1);
} else if (event.getButton() === 2) {
this.jumpByStep(2);
}
}
jumpByStep(step: number) {
if (this._isMoving) {
return;
}
this._startJump = true;
this._jumpStep = step;
this._curJumpTime = 0;
this._curJumpSpeed = this._jumpStep / this._jumpTime;
this.node.getPosition(this._curPos);
Vec3.add(this._targetPos, this._curPos, cc.v3(this._jumpStep, 0, 0));
this._isMoving = true;
this.CocosAnim.getState(‘cocos_anim_jump’).speed = 3.5; //跳跃动画时间比较长,这里加速播放
this.CocosAnim.play(‘cocos_anim_jump’); //播放跳跃动画
if (step === 1) {
//this.BodyAnim.play(‘oneStep’);
} else if (step === 2) {
this.BodyAnim.play(‘twoStep’);
}
this._curMoveIndex += step;
}
onOnceJumpEnd() {
this._isMoving = false;
this.CocosAnim.play(‘cocos_anim_idle’);
this.node.emit(‘JumpEnd’, this._curMoveIndex);
}
update (deltaTime: number) {
if (this._startJump) {
this._curJumpTime += deltaTime;
if (this._curJumpTime > this._jumpTime) {
// end
this.node.setPosition(this._targetPos);
this._startJump = false;
this.onOnceJumpEnd();
} else {
// tween
this.node.getPosition(this._curPos);
this._deltaPos.x = this._curJumpSpeed * deltaTime;
Vec3.add(this._curPos, this._curPos, this._deltaPos);
this.node.setPosition(this._curPos);
}
}
}
}
GameManager.ts
import { _decorator, Component, Prefab, instantiate, Node, LabelComponent, CCInteger} from “cc”;
import { PlayerController } from “./PlayerController”;
const { ccclass, property } = _decorator;
enum BlockType{
BT_NONE,
BT_STONE,
};
enum GameState{
GS_INIT,
GS_PLAYING,
GS_END,
};
@ccclass(“GameManager”)
export class GameManager extends Component {
@property({type: Prefab})
public cubePrfb: Prefab = null;
@property({type: CCInteger})
public roadLength: Number = 50;
private _road: number[] = [];
@property({type: Node})
public startMenu: Node = null;
@property({type: PlayerController})
public playerCtrl: PlayerController = null;
private _curState: GameState = GameState.GS_INIT;
@property({type: LabelComponent})
public stepsLabel: LabelComponent = null;
start () {
this.curState = GameState.GS_INIT;
this.playerCtrl.node.on(‘JumpEnd’, this.onPlayerJumpEnd, this);
}
init() {
this.startMenu.active = true;
this.generateRoad();
this.playerCtrl.setInputActive(false);
this.playerCtrl.node.setPosition(cc.v3());
this.playerCtrl.reset();
}
set curState (value: GameState) {
switch(value) {
case GameState.GS_INIT:
this.init();
break;
case GameState.GS_PLAYING:
this.startMenu.active = false;
this.stepsLabel.string = ‘0’; // 将步数重置为0
setTimeout(() => { //直接设置active会直接开始监听鼠标事件,做了一下延迟处理
this.playerCtrl.setInputActive(true);
}, 0.1);
break;
case GameState.GS_END:
break;
}
this._curState = value;
}
generateRoad() {
this.node.removeAllChildren();
this._road = [];
// startPos
this._road.push(BlockType.BT_STONE);
for (let i = 1; i < this.roadLength; i++) {
if (this._road[i-1] === BlockType.BT_NONE) {
this._road.push(BlockType.BT_STONE);
} else {
this._road.push(Math.floor(Math.random() * 2));
}
}
for (let j = 0; j < this._road.length; j++) {
let block: Node = this.spawnBlockByType(this._road[j]);
if (block) {
this.node.addChild(block);
block.setPosition(j, -1.5, 0);
}
}
}
spawnBlockByType(type: BlockType) {
let block = null;
switch(type) {
case BlockType.BT_STONE:
block = instantiate(this.cubePrfb);
break;
}
return block;
}
onStartButtonClicked() {
this.curState = GameState.GS_PLAYING;
}
checkResult(moveIndex: number) {
if (moveIndex <= this.roadLength) {
if (this._road[moveIndex] == BlockType.BT_NONE) { //跳到了空方块上
this.curState = GameState.GS_INIT;
}
} else { // 跳过了最大长度
this.curState = GameState.GS_INIT;
}
}
onPlayerJumpEnd(moveIndex: number) {
this.stepsLabel.string = ” + moveIndex;
this.checkResult(moveIndex);
}
// update (deltaTime: number) {
// // Your update function goes here.
// }
}
十二、总结
希望这篇快速入门教程能帮助您了解 Cocos Creator 3D 游戏开发流程中的基本概念和工作流程。如果您对编写和学习脚本编程不感兴趣,也可以直接从完成版的项目工程中把写好的脚本复制过来使用。
接下来您还可以继续完善游戏的各方各面,以下是一些推荐的改进方向:
- 为游戏增加难度,当角色在原地停留 1 秒就算失败
- 改为无限跑道,动态的删除已经跑过的跑道,延长后面的跑道。
- 增加游戏音效
- 为游戏增加结束菜单界面,统计玩家跳跃步数和所花的时间
- 用更漂亮的资源替换角色和跑道
- 可以增加一些可拾取物品来引导玩家“犯错”
- 添加一些粒子特效,例如角色运动时的拖尾、落地时的灰尘
- 为触屏设备加入两个操作按钮来代替鼠标左右键操作
下载完整工程:
https://github.com/cocos-creator/tutorial-mind-your-step-3d
仓库地址:
https://github.com/cocos-creator/docs-3d/tree/master/zh/getting-started/first-game
社区地址:
Cocos 引擎 UI 全新升级:进一步提升编辑器体验
我就知道你“在看”
点击[阅读原文]进入GitHub仓库!
cocos creator动画编辑器编辑地图路径
1、利用动画编辑器,设置一个路径,多个路径就编辑多个动画
2、用特定的代码对动画进行处理,获取到路径坐标,大佬已经写好代码, 不用自己重复造轮子了(微元法求曲线长度)
获得动画路径的贝塞尔曲线方程
求得每一段贝塞尔曲线的长度
每隔一小段打一个点
最终生成一个路径
3、编写寻路脚本,挂载到物体上,让沿着路径移动
动画编辑
脚本挂载
// gen_map_path.js 动画路径转换坐标的代码 已经升级到2.x
cc.Class({
extends: cc.Component,
properties: {
// foo: {
// default: null, // The default value will be used only when the component attaching
// to a node for the first time
// url: cc.Texture2D, // optional, default is typeof default
// serializable: true, // optional, default is true
// visible: true, // optional, default is true
// displayName: ‘Foo’, // optional
// readonly: false, // optional, default is false
// },
// …
is_debug: false,
},
// use this for initialization
onLoad: function() {
this.anim_com = this.node.getComponent(cc.Animation);
var clips = this.anim_com.getClips();
var clip = clips[0];
var newNode = new cc.Node();
this.new_draw_node = newNode.getComponent(cc.Graphics);
if (!this.new_draw_node) {
this.new_draw_node = this.node.addComponent(cc.Graphics);
}
this.node.addChild(newNode);
// this.draw_node = new cc.DrawNode();
// this.node._sgNode.addChild(this.draw_node);
var paths = clip.curveData.paths;
// console.log(paths);
this.road_data_set = [];
var k;
for (k in paths) {
var road_data = paths[k].props.position;
this.gen_path_data(road_data);
}
},
start: function() {
/*
// test()
var actor = cc.find(“UI_ROOT/map_root/ememy_gorilla”).getComponent(“actor”);
// actor.gen_at_road(this.road_data_set[0]);
actor = cc.find(“UI_ROOT/map_root/ememy_small2”).getComponent(“actor”);
// actor.gen_at_road(this.road_data_set[1]);
actor = cc.find(“UI_ROOT/map_root/ememy_small3”).getComponent(“actor”);
actor.gen_at_road(this.road_data_set[2]);
*/
// end
},
get_road_set: function() {
return this.road_data_set;
},
gen_path_data: function(road_data) {
var ctrl1 = null;
var start_point = null;
var end_point = null;
var ctrl2 = null;
var road_curve_path = []; // [start_point, ctrl1, ctrl2, end_point],
for (var i = 0; i < road_data.length; i++) {
var key_frame = road_data[i];
if (ctrl1 !== null) {
road_curve_path.push([start_point, ctrl1, ctrl1, cc.p(key_frame.value[0], key_frame.value[1])]);
}
start_point = cc.p(key_frame.value[0], key_frame.value[1]);
for (var j = 0; j < key_frame.motionPath.length; j++) {
var end_point = cc.p(key_frame.motionPath[j][0], key_frame.motionPath[j][1]);
ctrl2 = cc.p(key_frame.motionPath[j][2], key_frame.motionPath[j][3]);
if (ctrl1 === null) {
ctrl1 = ctrl2;
}
// 贝塞尔曲线 start_point, ctrl1, ctrl2, end_point,
road_curve_path.push([start_point, ctrl1, ctrl2, end_point]);
ctrl1 = cc.p(key_frame.motionPath[j][4], key_frame.motionPath[j][5]);
start_point = end_point;
}
}
console.log(road_curve_path);
var one_road = [road_curve_path[0][0]];
for (var index = 0; index < road_curve_path.length; index++) {
start_point = road_curve_path[index][0];
ctrl1 = road_curve_path[index][1];
ctrl2 = road_curve_path[index][2];
end_point = road_curve_path[index][3];
var len = this.bezier_length(start_point, ctrl1, ctrl2, end_point);
var OFFSET = 16;
var count = len / OFFSET;
count = Math.floor(count);
var t_delta = 1 / count;
var t = t_delta;
for (var i = 0; i < count; i++) {
var x = start_point.x * (1 – t) * (1 – t) * (1 – t) + 3 * ctrl1.x * t * (1 – t) * (1 – t) + 3 * ctrl2.x * t * t * (1 – t) + end_point.x * t * t * t;
var y = start_point.y * (1 – t) * (1 – t) * (1 – t) + 3 * ctrl1.y * t * (1 – t) * (1 – t) + 3 * ctrl2.y * t * t * (1 – t) + end_point.y * t * t * t;
one_road.push(cc.p(x, y));
t += t_delta;
}
}
console.log(one_road);
if (this.is_debug) {
this.new_draw_node.clear(); // 清除以前的
for (var i = 0; i < one_road.length; i++) {
this.new_draw_node.moveTo(one_road[i].x, one_road[i].y);
this.new_draw_node.lineTo(one_road[i].x + 1, one_road[i].y + 1);
this.new_draw_node.stroke();
// this.draw_node.drawSegment(one_road[i],
// cc.p(one_road[i].x + 1, one_road[i].y + 1),
// 1, cc.color(255, 0, 0, 255));
}
}
this.road_data_set.push(one_road);
},
bezier_length: function(start_point, ctrl1, ctrl2, end_point) {
// t [0, 1] t 分成20等分 1 / 20 = 0.05
var prev_point = start_point;
var length = 0;
var t = 0.05;
for (var i = 0; i < 20; i++) {
var x = start_point.x * (1 – t) * (1 – t) * (1 – t) + 3 * ctrl1.x * t * (1 – t) * (1 – t) + 3 * ctrl2.x * t * t * (1 – t) + end_point.x * t * t * t;
var y = start_point.y * (1 – t) * (1 – t) * (1 – t) + 3 * ctrl1.y * t * (1 – t) * (1 – t) + 3 * ctrl2.y * t * t * (1 – t) + end_point.y * t * t * t;
var now_point = cc.p(x, y);
var dir = now_point.sub(prev_point);
prev_point = now_point;
length += dir.mag();
t += 0.05;
}
return length;
}
// called every frame, uncomment this function to activate update callback
// update: function (dt) {
// },
});
// actor.js 角色沿路径行走代码
var gen_map_path = require(“gen_map_path”);
var State = {
Idle: 0,
Walk: 1,
Attack: 2,
Dead: 3,
};
cc.Class({
extends: cc.Component,
properties: {
// foo: {
// default: null, // The default value will be used only when the component attaching
// to a node for the first time
// url: cc.Texture2D, // optional, default is typeof default
// serializable: true, // optional, default is true
// visible: true, // optional, default is true
// displayName: ‘Foo’, // optional
// readonly: false, // optional, default is false
// },
// …
map: {
type: gen_map_path,
default: null,
},
speed: 100,
},
// use this for initialization
onLoad: function() {
},
start: function() {
var road_set = this.map.get_road_set();
this.cur_road = road_set[0];
if (this.cur_road < 2) {
return;
}
this.state = State.Idle;
var pos = this.cur_road[0];
this.node.setPosition(pos);
this.walk_to_next = 1;
this.start_walk();
},
start_walk: function() {
if (this.walk_to_next >= this.cur_road.length) {
// 攻击逻辑
this.state = State.Attack;
//
return;
}
var src = this.node.getPosition();
var dst = this.cur_road[this.walk_to_next];
var dir = dst.sub(src);
var len = dir.mag();
this.vx = this.speed * dir.x / len;
this.vy = this.speed * dir.y / len;
this.walk_total_time = len / this.speed;
this.walked_time = 0;
this.state = State.Walk;
},
walk_update: function(dt) {
if (this.state != State.Walk) {
return;
}
this.walked_time += dt;
if (this.walked_time > this.walk_total_time) {
dt -= (this.walked_time – this.walk_total_time);
}
var sx = this.vx * dt;
var sy = this.vy * dt;
this.node.x += sx;
this.node.y += sy;
if (this.walked_time >= this.walk_total_time) {
this.walk_to_next++;
this.start_walk();
}
},
// called every frame, uncomment this function to activate update callback
update: function(dt) {
if (this.state == State.Walk) {
this.walk_update(dt);
}
},
作者:游戏开发大表哥
链接:https://www.jianshu.com/p/99d1ce8d799e
来源:简书
著作权归作者所有。商业转载请联系作者获得授权,非商业转载请注明出处。
cocos creator 3D动画组件 AnimationComponent
AnimationComponent的使用
    private _showRunEndAni()
    {
        this._aniComponent = this.node.children[0].getComponent(AnimationComponent);
        this._aniComponent.crossFade("run_end",this._duration);
         this._aniComponent.on(AnimationComponent.EventType.FINISHED,()=>{
            this._aniComponent.crossFade("get",this._duration);
        },this);
    }
crossFade 会在指定的周期内平滑地完成切换。
play 立即切换到指定动画状态。
pause 暂停所有动画状态,并暂停所有切换。
resume 恢复所有动画状态,并恢复所有切换。
stop 停止所有动画状态,并停止所有切换。
动画事件回调
 export enum EventType {
            PLAY = "play",              //开始播放
            STOP = "stop",              //停止播放
            PAUSE = "pause",            //暂停播放
            RESUME = "resume",          //恢复播放
            LASTFRAME = "lastframe",    //最后一帧
            FINISHED = "finished"       //播放完成
        }
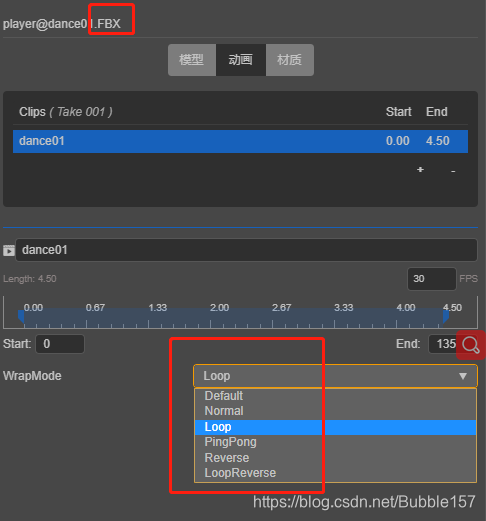
导入FBX文件,默认是循环播放,若不需要循环播放,可在编辑器中改为正常播放