1. CREATE DATABASE landon_app;
2. CREATE USER 'landon_app'@'localhost' IDENTIFIED BY 'landon_app';
3. GRANT ALL ON landon_app.* TO 'landon_app'@'localhost';
     SQLSTATE[HY000] [1045] Access denied for user 'landon_app'@'localhost' (using password: YES) (SQL: select * from information_schema.tables where table_sc
  hema = landon_app and table_name = migrations)

  SQLSTATE[HY000] [1045] Access denied for user 'landon_app'@'localhost' (using password: YES)
<?php

return [

    /*
    |--------------------------------------------------------------------------
    | Default Database Connection Name
    |--------------------------------------------------------------------------
    |
    | Here you may specify which of the database connections below you wish
    | to use as your default connection for all database work. Of course
    | you may use many connections at once using the Database library.
    |
    */

    'default' => env('DB_CONNECTION', 'mysql'),

    /*
    |--------------------------------------------------------------------------
    | Database Connections
    |--------------------------------------------------------------------------
    |
    | Here are each of the database connections setup for your application.
    | Of course, examples of configuring each database platform that is
    | supported by Laravel is shown below to make development simple.
    |
    |
    | All database work in Laravel is done through the PHP PDO facilities
    | so make sure you have the driver for your particular database of
    | choice installed on your machine before you begin development.
    |
    */

    'connections' => [

        'sqlite' => [
            'driver' => 'sqlite',
            'database' => env('DB_DATABASE', database_path('database.sqlite')),
            'prefix' => '',
        ],

        'mysql' => [
            'driver' => 'mysql',
            'host' => env('DB_HOST', '127.0.0.1'),
            'port' => env('DB_PORT', '3306'),
            'database' => env('DB_DATABASE', 'forge'),
            'username' => env('DB_USERNAME', 'forge'),
            'password' => env('DB_PASSWORD', ''),
            'unix_socket' => env('DB_SOCKET', ''),
            'charset' => 'utf8mb4',
            'collation' => 'utf8mb4_unicode_ci',
            'prefix' => '',
            'strict' => true,
            'engine' => null,
        ],

        'pgsql' => [
            'driver' => 'pgsql',
            'host' => env('DB_HOST', '127.0.0.1'),
            'port' => env('DB_PORT', '5432'),
            'database' => env('DB_DATABASE', 'forge'),
            'username' => env('DB_USERNAME', 'forge'),
            'password' => env('DB_PASSWORD', ''),
            'charset' => 'utf8',
            'prefix' => '',
            'schema' => 'public',
            'sslmode' => 'prefer',
        ],

        'sqlsrv' => [
            'driver' => 'sqlsrv',
            'host' => env('DB_HOST', 'localhost'),
            'port' => env('DB_PORT', '1433'),
            'database' => env('DB_DATABASE', 'forge'),
            'username' => env('DB_USERNAME', 'forge'),
            'password' => env('DB_PASSWORD', ''),
            'charset' => 'utf8',
            'prefix' => '',
        ],

    ],

    /*
    |--------------------------------------------------------------------------
    | Migration Repository Table
    |--------------------------------------------------------------------------
    |
    | This table keeps track of all the migrations that have already run for
    | your application. Using this information, we can determine which of
    | the migrations on disk haven't actually been run in the database.
    |
    */

    'migrations' => 'migrations',

    /*
    |--------------------------------------------------------------------------
    | Redis Databases
    |--------------------------------------------------------------------------
    |
    | Redis is an open source, fast, and advanced key-value store that also
    | provides a richer set of commands than a typical key-value systems
    | such as APC or Memcached. Laravel makes it easy to dig right in.
    |
    */

    'redis' => [

        'client' => 'predis',

        'default' => [
            'host' => env('REDIS_HOST', '127.0.0.1'),
            'password' => env('REDIS_PASSWORD', null),
            'port' => env('REDIS_PORT', 6379),
            'database' => 0,
        ],

    ],

];
用root用户连接MySQL 数据库报”ERROR 1698 : Access denied for user ‘root’@‘localhost’” 错误。 客户端:terminal,Navicat,连接都该错误报错误. 系统环境:ubuntu 18,MySQL5.7 原因:The reason is that recent Ubuntu installation (maybe others also), mysql is using by default the UNIX auth_socket plugin.
Basically means that: db_users using it, will be “auth” by the system user credentias. You can see if your root user is set up like this by doing the following:
$ sudo mysql -u root # I had to use “sudo” since is new installation
mysql> USE mysql;
mysql> SELECT User, Host, plugin FROM mysql.user;
±—————–±———————-+
| User | plugin |
±—————–±———————-+
| root | auth_socket |
| mysql.sys | mysql_native_password |
| debian-sys-maint | mysql_native_password
±—————–±———————-+
As you can see in the query, the root user is using the auth_socket plugin
There are 2 ways to solve this:
You can set the root user to use the mysql_native_password plugin
You can create a new db_user with you system_user (recommended)
Option 1:
$ sudo mysql -u root # I had to use “sudo” since is new installation
mysql> USE mysql;
mysql> UPDATE user SET plugin=‘mysql_native_password’ WHERE User=‘root’;
mysql> FLUSH PRIVILEGES;
mysql> exit;
$ service mysql restart
Option 2: (replace YOUR_SYSTEM_USER with the username you have)
$ sudo mysql -u root # I had to use “sudo” since is new installation
mysql> USE mysql;
mysql> CREATE USER ‘YOUR_SYSTEM_USER’@‘localhost’ IDENTIFIED BY ‘’;
mysql> GRANT ALL PRIVILEGES ON . TO ‘YOUR_SYSTEM_USER’@‘localhost’;
mysql> UPDATE user SET plugin=‘auth_socket’ WHERE User=‘YOUR_SYSTEM_USER’;
mysql> FLUSH PRIVILEGES;
mysql> exit;
$ service mysql restart
Remember that if you use option #2 you’ll have to connect to mysql as your system username (mysql -u YOUR_SYSTEM_USER)
Note: On some systems (e.g., Debian stretch) ‘auth_socket’ plugin is called ‘unix_socket’, so the corresponding SQL command should be: UPDATE user SET plugin=‘unix_socket’ WHERE User=‘YOUR_SYSTEM_USER’;
————————————————
版权声明:本文为CSDN博主「sharps-liu」的原创文章,遵循CC 4.0 by-sa版权协议,转载请附上原文出处链接及本声明。
原文链接:https://blog.csdn.net/qq_40342015/article/details/82796710
a. 启动 master server:./redis6666/redis-server redis6666/redis.conf
b. 连接 master cli: ./redis6666/redis-cli -p 6666
c. 查看主服务器连接状态: info replication
1
2
3
d. 启动 slave server: ./redis7777/redis-server redis7777/redis.conf
e. 启动 slave cli : ./redis7777/redis-cli -p 7777
f. 查看 从服务器连接状态: info replication
1
2
3
四、 备份数据测试
1、 Master 插入一条数据:
127.0.0.1:6666> set name helloworld
OK
1
2
2、Slave 获取数据:
127.0.0.1:7777> get name
“helloworld”
1
2
操作到这里: redis 主从配置成功了。
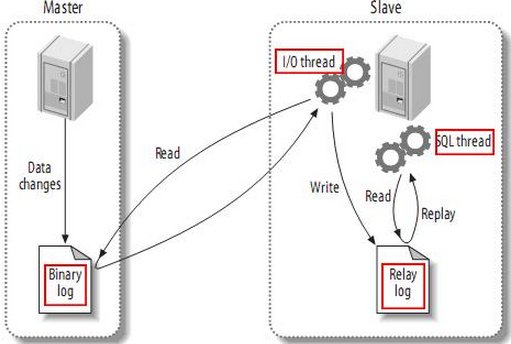
a. MySQL支持单向、异步复制,复制过程中一个服务器充当主服务器,而一个或多个其它服务器充当从服务器。MySQL复制基于主服务器在二进制日志中跟踪所有对数据库的更改(更新、删除等等)。因此,要进行复制,必须在主服务器上启用二进制日志。每个从服务器从主服务器接收主服务器上已经记录到其二进制日志的保存的更新。当一个从服务器连接主服务器时,它通知主服务器定位到从服务器在日志中读取的最后一次成功更新的位置。从服务器接收从那时起发生的任何更新,并在本机上执行相同的更新。然后封锁并等待主服务器通知新的更新。从服务器执行备份不会干扰主服务器,在备份过程中主服务器可以继续处理更新。
b. MySQL使用3个线程来执行复制功能,其中两个线程(Sql线程和IO线程)在从服务器,另外一个线程(IO线程)在主服务器。 当发出START SLAVE时,从服务器创建一个I/O线程,以连接主服务器并让它发送记录在其二进制日志中的语句。主服务器创建一个线程将二进制日志中的内容发送到从服务器。该线程可以即为主服务器上SHOW PROCESSLIST的输出中的Binlog Dump线程。从服务器I/O线程读取主服务器Binlog Dump线程发送的内容并将该数据拷贝到从服务器数据目录中的本地文件中,即中继日志。第3个线程是SQL线程,由从服务器创建,用于读取中继日志并执行日志中包含的更新。在从服务器上,读取和执行更新语句被分成两个独立的任务。当从服务器启动时,其I/O线程可以很快地从主服务器索取所有二进制日志内容,即使SQL线程执行更新的远远滞后。