今天服务器速度非常慢我开始查找原因
free -m
total used free shared buffers cached
Mem: 64376 63359 1016 14 3921 47879
-/+ buffers/cache: 11558 52817
Swap: 0 0 0
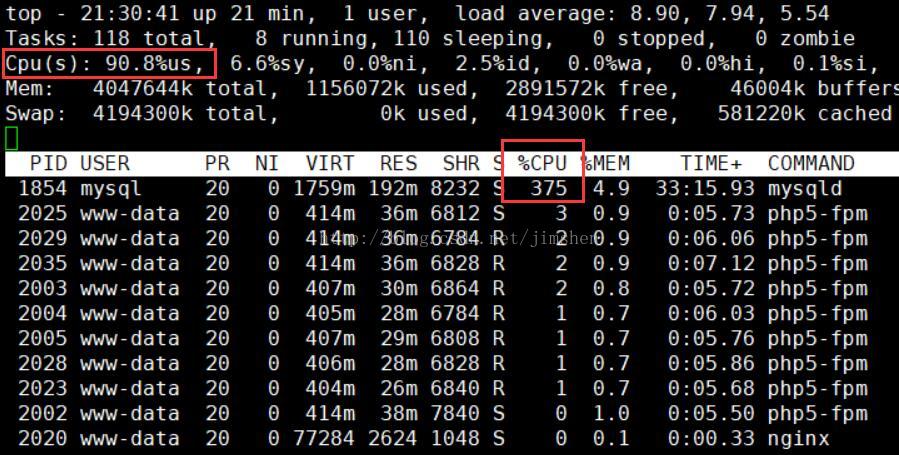
内存还有一个g不应该这么慢,于是我又使用top 命令查找查看使用cpu情况
top
12303 root 20 0 109m 2112 1040 S 3.0 0.0 0:10.76 iptraf
41025 mysql 20 0 9805m 4.2g 8128 S 1.7 6.6 38246:01 mysqld
4371 root 20 0 268m 14m 3108 S 0.3 0.0 15:21.91 php
1 root 20 0 19232 1392 1116 S 0.0 0.0 10:42.25 init
2 root 20 0 0 0 0 S 0.0 0.0 0:00.01 kthreadd
3 root RT 0 0 0 0 S 0.0 0.0 2:43.78 migration/0
4 root 20 0 0 0 0 S 0.0 0.0 6:24.98 ksoftirqd/0
5 root RT 0 0 0 0 S 0.0 0.0 0:00.00 stopper/0
6 root RT 0 0 0 0 S 0.0 0.0 1:50.76 watchdog/0
7 root RT 0 0 0 0 S 0.0 0.0 2:01.49 migration/1
8 root RT 0 0 0 0 S 0.0 0.0 0:00.00 stopper/1
9 root 20 0 0 0 0 S 0.0 0.0 2:29.09 ksoftirqd/1
10 root RT 0 0 0 0 S 0.0 0.0 1:24.89 watchdog/1
11 root RT 0 0 0 0 S 0.0 0.0 1:55.64 migration/2
12 root RT 0 0 0 0 S 0.0 0.0 0:00.00 stopper/2
13 root 20 0 0 0 0 S 0.0 0.0 3:30.81 ksoftirqd/2
14 root RT 0 0 0 0 S 0.0 0.0 1:26.45 watchdog/2
15 root RT 0 0 0 0 S 0.0 0.0 1:35.35 migration/3
16 root RT 0 0 0 0 S 0.0 0.0 0:00.00 stopper/3
17 root 20 0 0 0 0 S 0.0 0.0 2:35.25 ksoftirqd/3
18 root RT 0 0 0 0 S 0.0 0.0 1:25.91 watchdog/3
19 root 20 0 0 0 0 S 0.0 0.0 69:40.89 events/0
20 root 20 0 0 0 0 S 0.0 0.0 51:41.39 events/1
21 root 20 0 0 0 0 S 0.0 0.0 63:19.08 events/2
22 root 20 0 0 0 0 S 0.0 0.0 69:33.61 events/3
23 root 20 0 0 0 0 S 0.0 0.0 0:00.00 cgroup
可以看出mysql 的cpu 使用率达到100%,可以看出MySQL有优化的地方
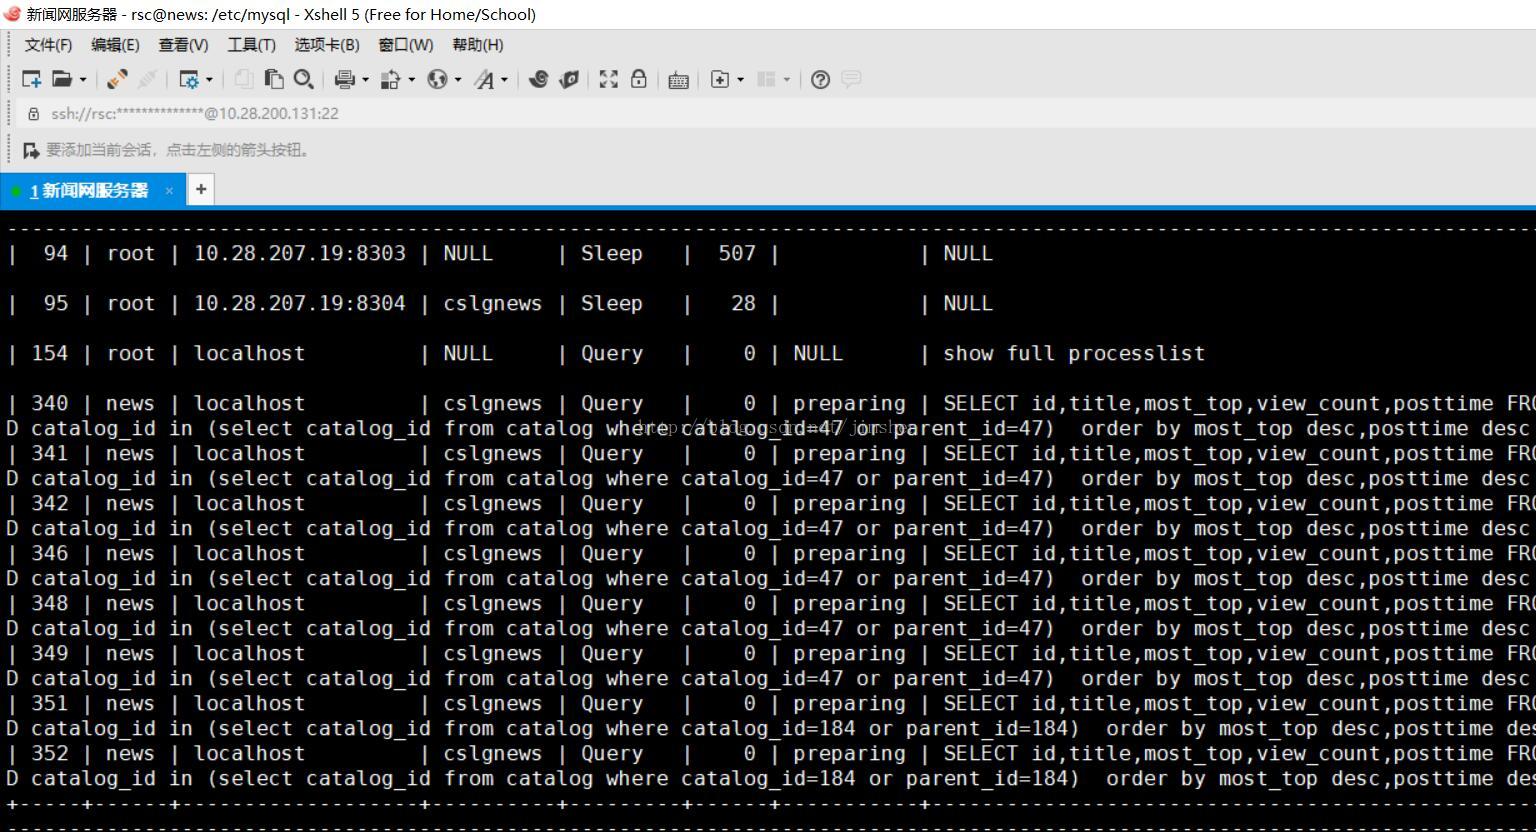
第一步肯定是线看看是不是mysql使用的线程十分多,如果线程十分多可能出现两种情况 nginx 访问量比较大,要不就是程序架构出现问题,导致cpu占用十分高
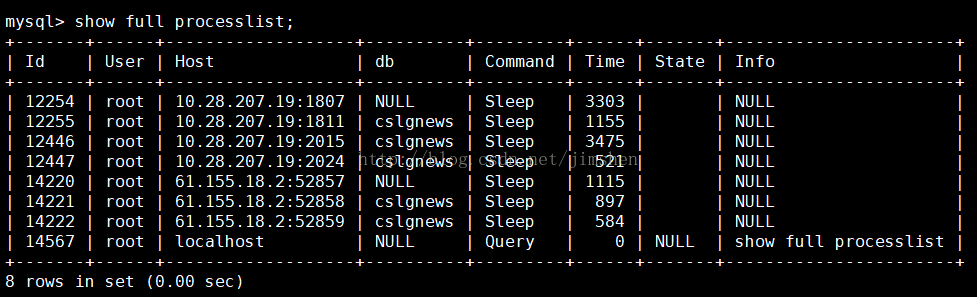
show full processlist;
+——–+——+—————–+——–+———+——+——-+———————–+
| Id | User | Host | db | Command | Time | State | Info |
+——–+——+—————–+——–+———+——+——-+———————–+
| 386527 | root | 127.0.0.1:49172 | screen | Sleep | 1 | | NULL |
| 386528 | root | 127.0.0.1:49173 | screen | Sleep | 2 | | NULL |
| 386529 | root | 127.0.0.1:49174 | screen | Sleep | 1 | | NULL |
| 386530 | root | 127.0.0.1:49175 | screen | Sleep | 0 | | NULL |
| 524172 | root | localhost | NULL | Query | 0 | init | show full processlist |
+——–+——+—————–+——–+———+——+——-+———————–+
5 rows in set (0.00 sec)
可以看出只有5个线程,所以这不是mysql cpu占用100%的使用原因
show variables like ‘%slowquerylog%’;
查找慢日志查询
+---------------------+--------------------------------+
| Variable_name | Value |
+———————+——————————–+
| slow_query_log | ON |
| slow_query_log_file | /data/mysql/long_logs/long.log |
+———————+——————————–+
日志位置位于/data/mysql/long_logs/long.log
vim /data/mysql/long_logs/long.log
查看慢日志
Time: 170104 10:41:04
User@Host: root[root] @ [127.0.0.1] Id: 785264
Query_time: 2.082531 Lock_time: 0.000132 Rows_sent: 0 Rows_examined: 437963
SET timestamp=1483497664;
SELECT id,update_time,update_end_time,ctime FROM sg_point_log WHERE pid = 105 AND date(ctime) = curdate() AND (update_time != 0 OR update_end_time != 0) ORDER BY id DESC limit 1;
Time: 170104 10:42:06
User@Host: root[root] @ [127.0.0.1] Id: 785461
Query_time: 2.037191 Lock_time: 0.000162 Rows_sent: 0 Rows_examined: 438013
SET timestamp=1483497726;
SELECT id,update_time,update_end_time,ctime FROM sg_point_log WHERE pid = 203 AND date(ctime) = curdate() AND (update_time != 0 OR update_end_time != 0) ORDER BY id DESC limit 1;
Time: 170104 10:42:10
User@Host: root[root] @ [127.0.0.1] Id: 785549
Query_time: 2.003415 Lock_time: 0.000071 Rows_sent: 0 Rows_examined: 438016
SET timestamp=1483497730;
SELECT id,update_time,update_end_time,ctime FROM sg_point_log WHERE pid = 281 AND date(ctime) = curdate() AND (update_time != 0 OR update_end_time != 0) ORDER BY id DESC limit 1;
Time: 170104 10:42:14
User@Host: root[root] @ [127.0.0.1] Id: 785264
Query_time: 2.152803 Lock_time: 0.000127 Rows_sent: 0 Rows_examined: 438018
SET timestamp=1483497734;
SELECT id,update_time,update_end_time,ctime FROM sg_point_log WHERE pid = 8 AND date(ctime) = curdate() AND (update_time != 0 OR update_end_time != 0) ORDER BY id DESC limit 1;
Time: 170104 10:42:16
User@Host: root[root] @ [127.0.0.1] Id: 785264
Query_time: 2.040670 Lock_time: 0.000077 Rows_sent: 0 Rows_examined: 438021
SET timestamp=1483497736;
SELECT id,upload_img_time,ctime FROM sg_point_log WHERE pid = 7 AND date(ctime) = curdate() AND upload_img_time != 0 ORDER BY id DESC limit 1;
Time: 170104 10:42:18
User@Host: root[root] @ [127.0.0.1] Id: 785264
Query_time: 2.139948 Lock_time: 0.000124 Rows_sent: 0 Rows_examined: 438025
SET timestamp=1483497738;
SELECT id,update_time,update_end_time,ctime FROM sg_point_log WHERE pid = 7 AND date(ctime) = curdate() AND (update_time != 0 OR update_end_time != 0) ORDER BY id DESC limit 1;
可以看出罪魁祸首就是
SELECT id,upload_img_time,ctime FROM sg_point_log WHERE pid = 1105 AND date(ctime) = curdate() AND upload_img_time != 0 ORDER BY id DESC limit 1;
然后用mysql 执行这个sql语句速度居然慢到
mysql> SELECT id,upload_img_time,ctime FROM sg_point_log WHERE pid = 1105 AND date(ctime) = curdate() AND upload_img_time != 0 ORDER BY id DESC limit 1;
Empty set (20.65 sec)